1. Bind Your Domain
This section explains how to configure and bind your custom domain. Once configured successfully, you can directly use your own domain to access the created sites and pages. This provides better consistency for brand promotion and website identity. We recommend binding your official domain in the production environment.
The following are the detailed configuration steps:
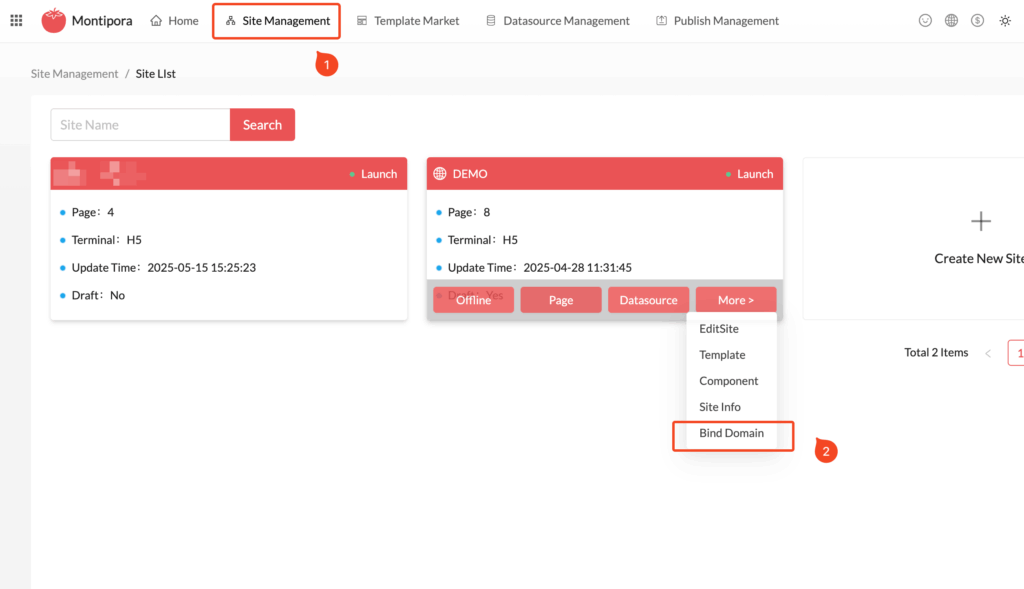
- Log in to the Activity Management Platform (https://page.coraool.com);
- Click the Site Management menu at the top and select the site you want to configure. If no site exists, you’ll need to create one first;
- Click More, select the Bind Domain menu, and enter the domain configuration list for the site.
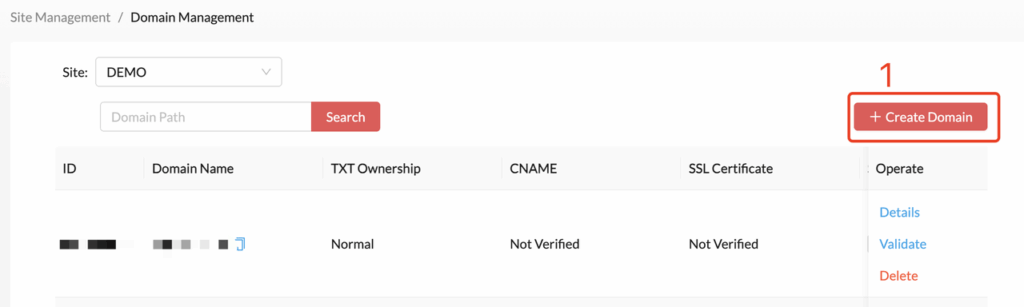
- If no domain has been configured, the list will be empty or contain a temporary subdomain automatically generated by the system. You can click Create Domain in the upper right corner to bind a new domain and follow the setup wizard. Binding multiple custom domains is also supported.
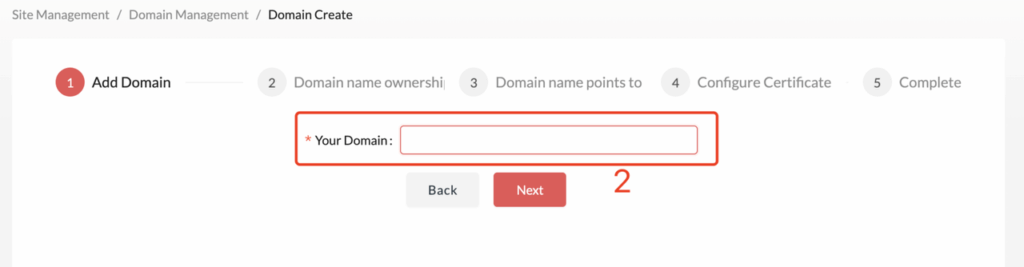
- Enter the domain you want to bind. It is recommended to configure a dedicated subdomain for your site—for example, if your domain is example.com, you can use demo.example.com. Make sure it matches the DNS records configured with your domain provider.
1.1 Validate Domain Ownership
This step is mainly used to verify that you have actual control over the specified domain. If you are not a technical user, you may need to contact an administrator or someone with the necessary permissions to help you complete the configuration. The process is very simple and is described as follows:
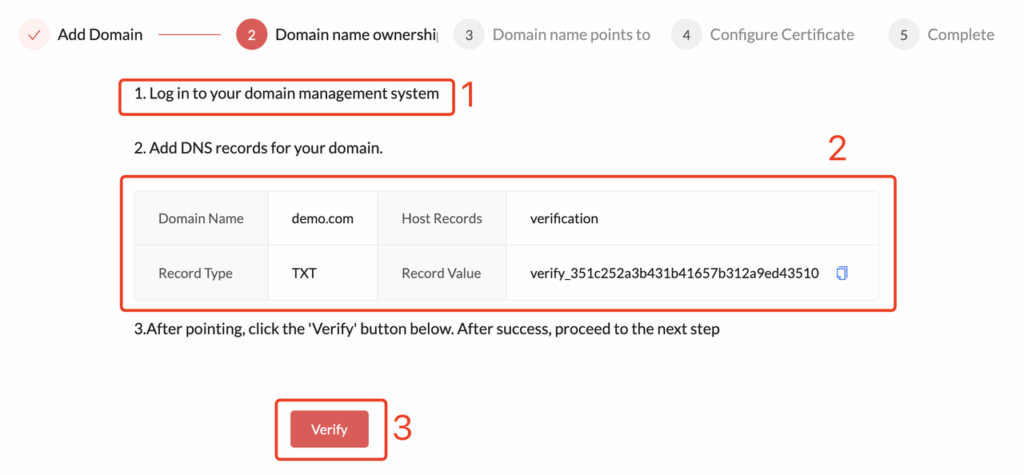
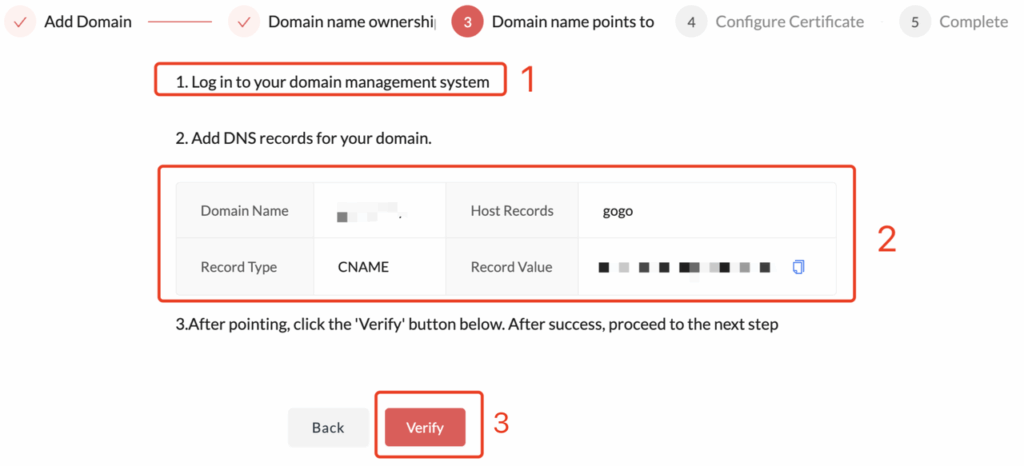
- In this step, you will see a domain ownership verification record form as shown in the image above.
- According to the domain service provider you are using, you need to add a TXT record to the corresponding domain in your provider’s DNS settings. The value to be added is shown in the example above.
verify_351c252a3b43**********Add a new DNS verification record with the specified Record Type and Record Value, referring to the example for your specific domain service provider. - Finally, click Verify. Once the verification is successful, you will automatically proceed to the next step.
1.2 Example: Cloudflare Guide
1.2.1 Choose Domain
- Login to Cloudflare Platform(https://dash.cloudflare.com/)
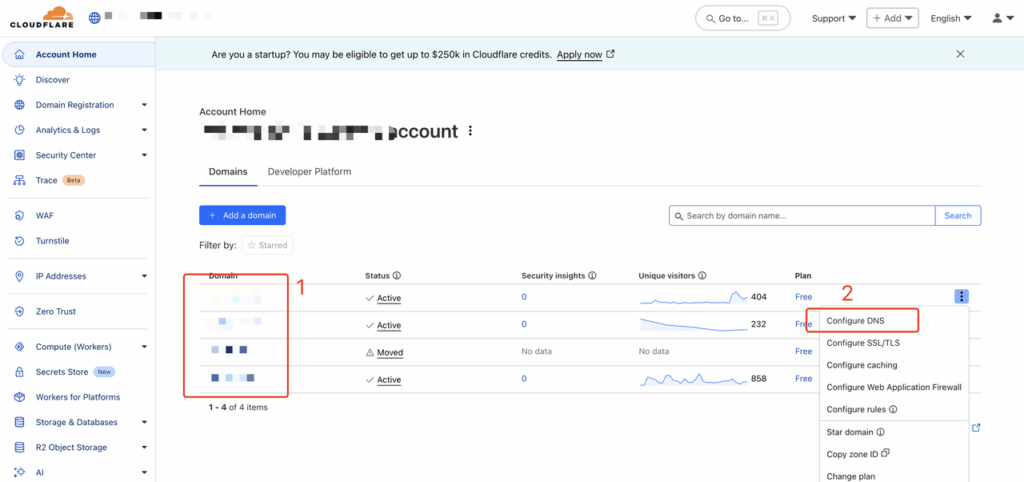
- Confirm the domain you want to configure, then click Configure DNS.
1.2.2 Add TXT Record
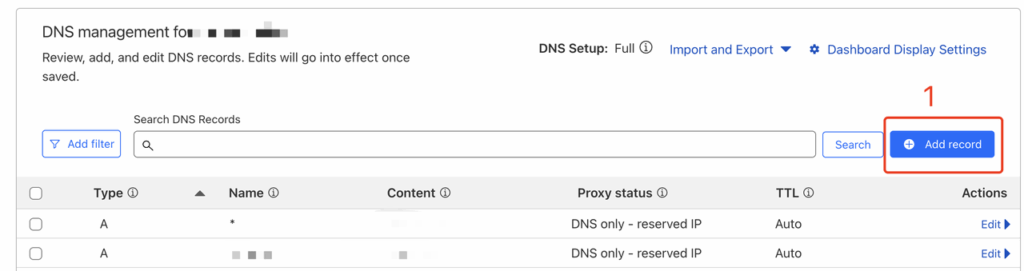
- Click
Add recordButton to add an new DNS record;
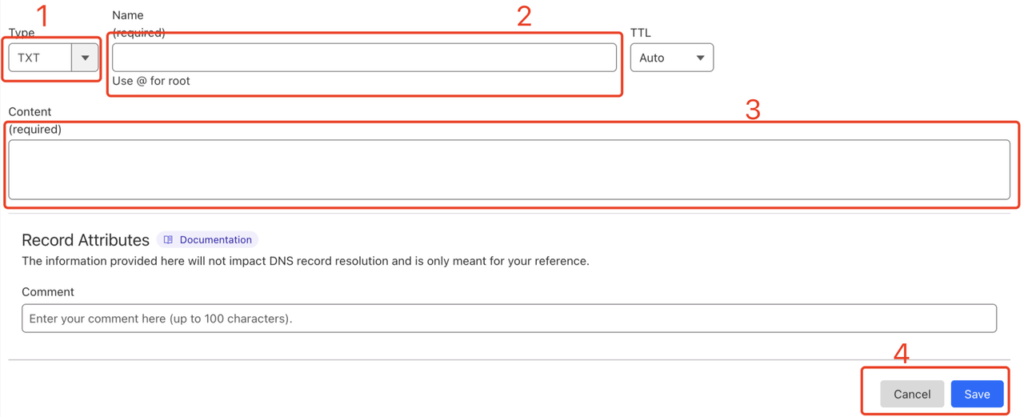
- Type: Choose TXT Type;
- Name: Enter the value by copying the Host Records from the domain ownership verification page, and ensure they match exactly;
- Content: Enter the value by copying the Record Value from the domain ownership configuration page, and make sure it matches exactly;
- Save: Click
Savebutton to complete the creation;
1.3 Example: ALIDNS Guide
1.3.1 Choose Domain
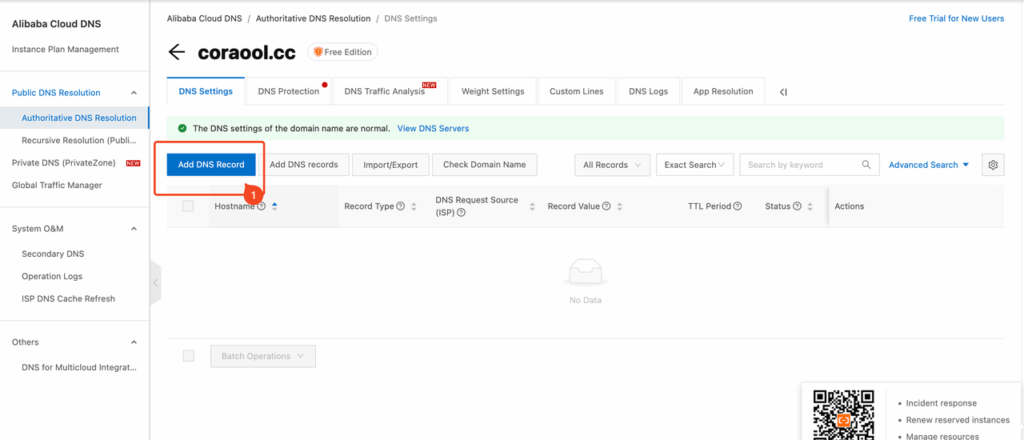
Login to ALIDNS console:https://dns.console.aliyun.com/
1.3.2 Add TXT Record
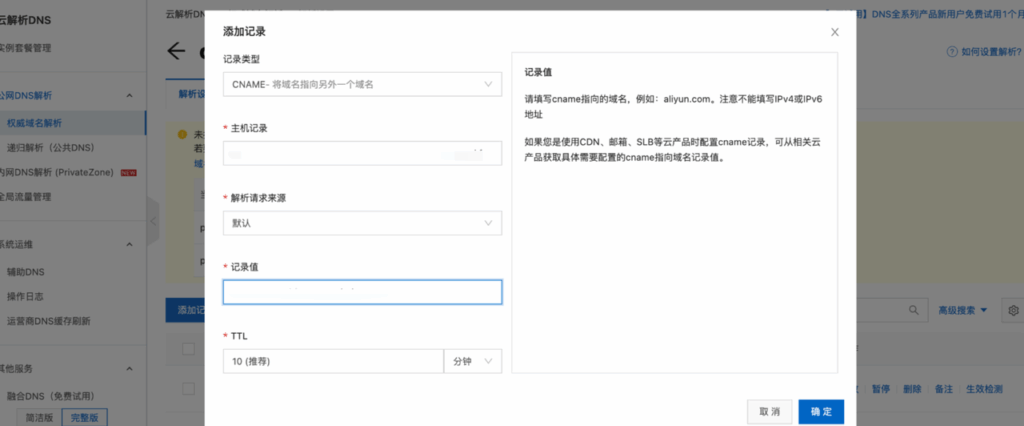
Record Type:Choose TXT Type;
Hostname:Enter the value by copying the Host Records from the domain ownership verification page, and ensure they match exactly;
Record Value:Enter the value by copying the Record Value from the domain ownership configuration page, and make sure it matches exactly;
点击OK后,等待1分钟左右刷新域名所有权验证页面即可生效。
2. CNAME Configuration
Our product currently supports one of the most convenient and non-intrusive CNAME binding methods in the industry. Once the binding is successful, your customers can directly use your domain to access the generated site and pages. The specific configuration steps are as follows:
- As shown in the image, go to the third step of domain binding: Domain CNAME Binding, where you will see a CNAME record automatically generated for you.
- Log in to your domain provider’s system and add a new CNAME record using the Record Value shown in the interface. Configuration steps may vary slightly depending on your provider, so please refer to the corresponding example below for detailed instructions.
- After completing the setup, click Verify. If the verification is successful, the domain binding is complete.
2.1 Example:Cloudflare (Proxy Mode)
If you are using Cloudflare’s Proxy mode, DNS is handled through a proxy routing mechanism rather than traditional DNS resolution. In this case, the configuration involves two steps: setting up a Custom Hostname certificate in Cloudflare and adding a CNAME record.
2.1.1 Add CNAME Record
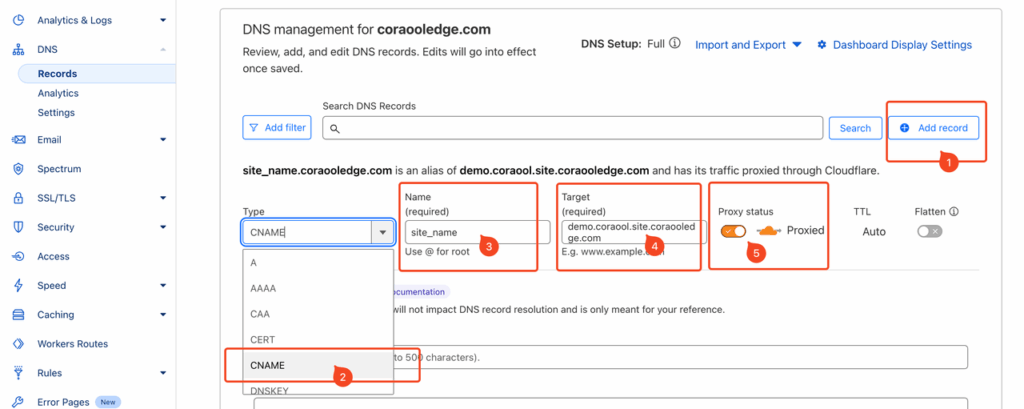
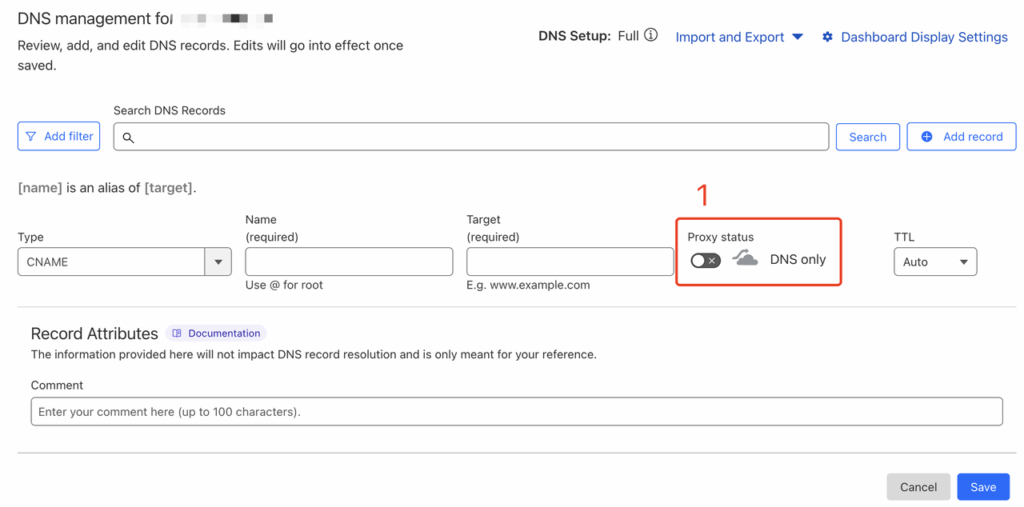
Log in to your domain provider’s system, click the left-hand menu to select your domain → DNS → Record, then click Add Record to add a CNAME DNS record. Fill in the fields as shown in the example.
- Type: Select CNAME as the record type;
- Name: Enter the domain you plan to use for the site. If it is a root domain, you can use @ as the value;
- Target: Enter the CNAME Record Value generated in the CORAOOL system;
- Proxy Status: Make sure it is enabled (orange icon).
2.1.2 Add Cloudflare Custom Hostname Certification
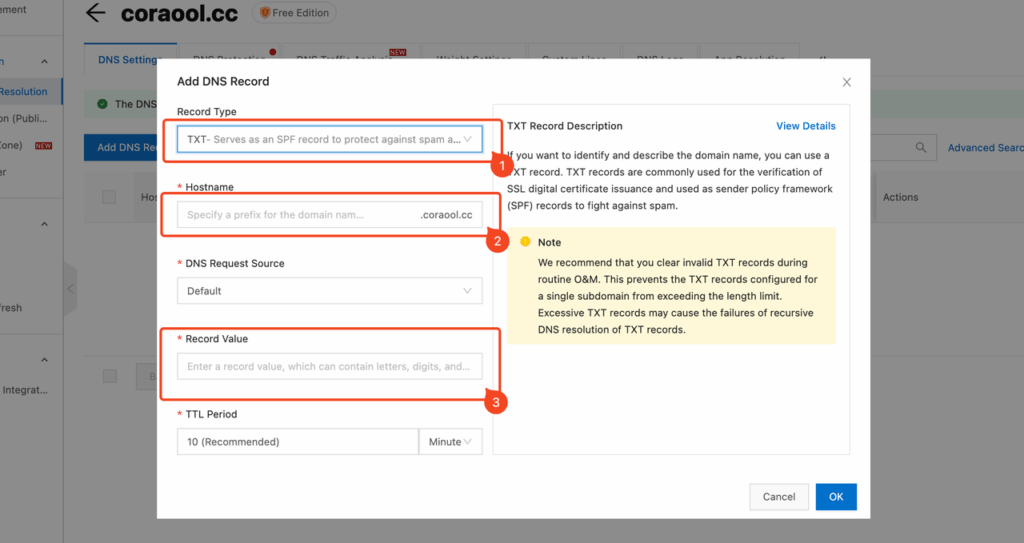
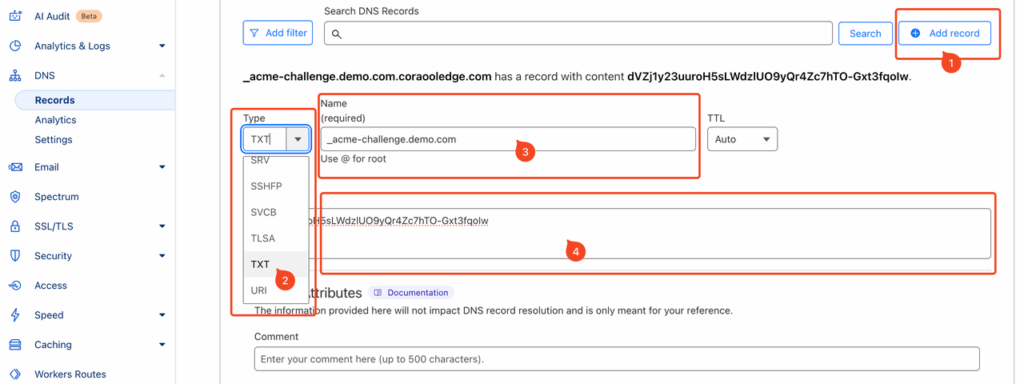
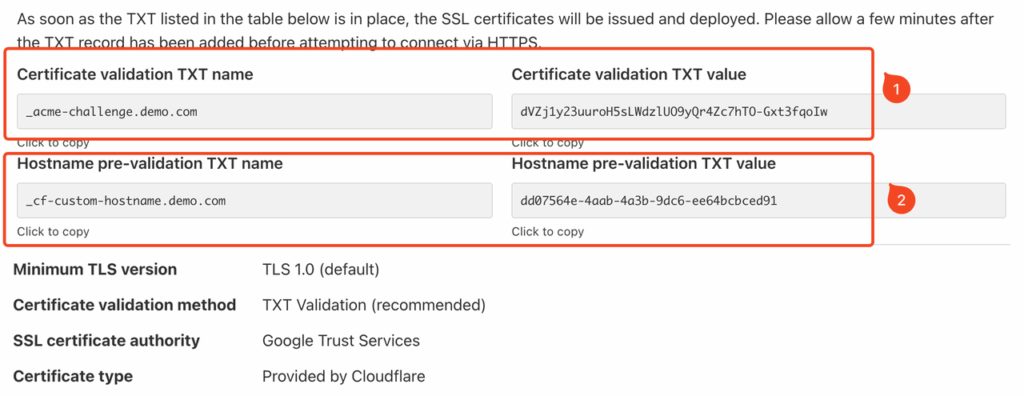
In the DNS configuration interface, click Add Record to add two TXT DNS records, and fill them in as shown in the example.
- Type: Select TXT as the record type;
- Name: This is the Certificate validation TXT Name generated during the domain binding process in CORAOOL, such as _acme-challenge.demo.com shown in the example;
- Value: This is the Certificate validation TXT Value generated by CORAOOL, such as dVZj1y23uuroH5sL******* shown in the example;
- The Hostname pre-validation TXT Name should be configured in the same way.
The specific record values will be automatically generated during the domain binding process in CORAOOL, similar to the following example:
2.2 Example: Cloudflare (DNS Only)
If you are using Cloudflare’s DNS Only mode, the setup is the same as with traditional DNS providers.
2.2.1 Add CNAME Record
The method for adding the record is the same as in Proxy mode.
The main difference here is that traffic is no longer routed through Cloudflare’s proxy; only its DNS resolution function is used. You simply need to set Proxy Status to Disable.
2.2.2 Add Cloudflare Custom Hostname Certification
The verification configuration steps here are the same as those described in section 2.1.2.
2.3 Example: ALIDNS
2.3.1 Add CNAME Record
3. SSL Certification
3.1 Configuration
If your site requires secure HTTPS access, you will need to configure a trusted SSL certificate here. To enhance customer security, we currently enforce the use of HTTPS. If you have special requirements and need to use HTTP only, please contact our support team.
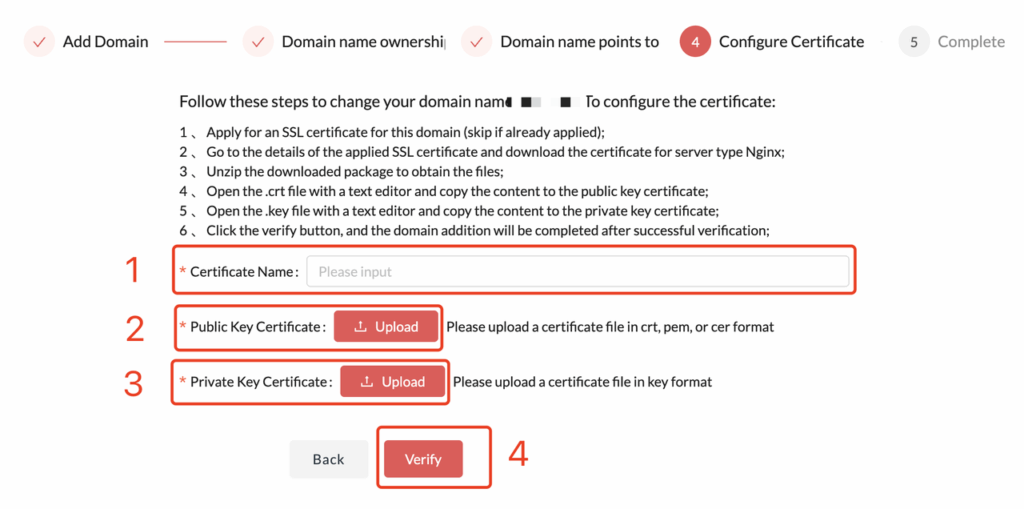
- Certificate Name: You can enter any text here as a note, typically the issue date such as “2025-05”.
- Public Key Certificate: The public key of your SSL certificate. Refer to your certificate provider’s instructions to obtain it. Supported formats include .crt, .pem, and .cer, and the content should be in plain text.
- Private Key Certificate: The private key of your SSL certificate. Refer to your certificate provider’s instructions to obtain it. The supported format is .key, and the content should be in plain text.
- After clicking the Verify button, successful verification completes the domain configuration. It typically takes effect within 10 minutes.
3.2 Example: Cloudflare(Proxy Mode)
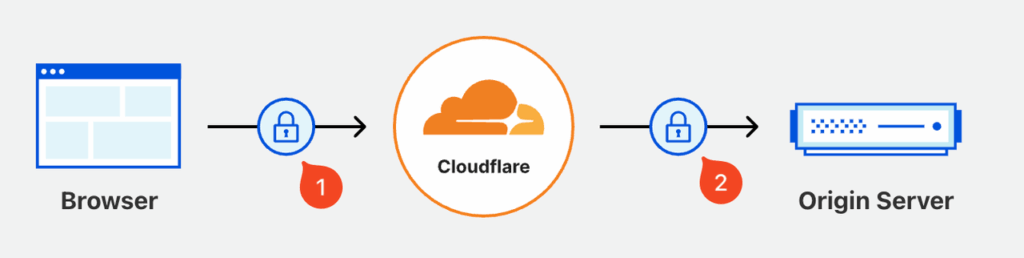
If you are currently using Cloudflare’s proxy access mode, the connection is divided into two segments, each involving a separate certificate:
- The direct connection between the user and Cloudflare (typically using a commercial certificate, often paid);
- The connection between Cloudflare and the service provider (usually an internal certificate, free, generated by Cloudflare, and typically valid for up to 15 years).
Therefore, the certificate that needs to be configured here is the origin server trust certificate, not the certificate used by the client browser. This is the internal trust certificate generated within the Cloudflare platform. The specific configuration steps are as follows:
- Go to the Cloudflare homepage, select the domain you are configuring, and click SSL/TLS → Origin Server from the left-hand menu.
- Click Create Certificate, and fill in the domain certificate information as required.
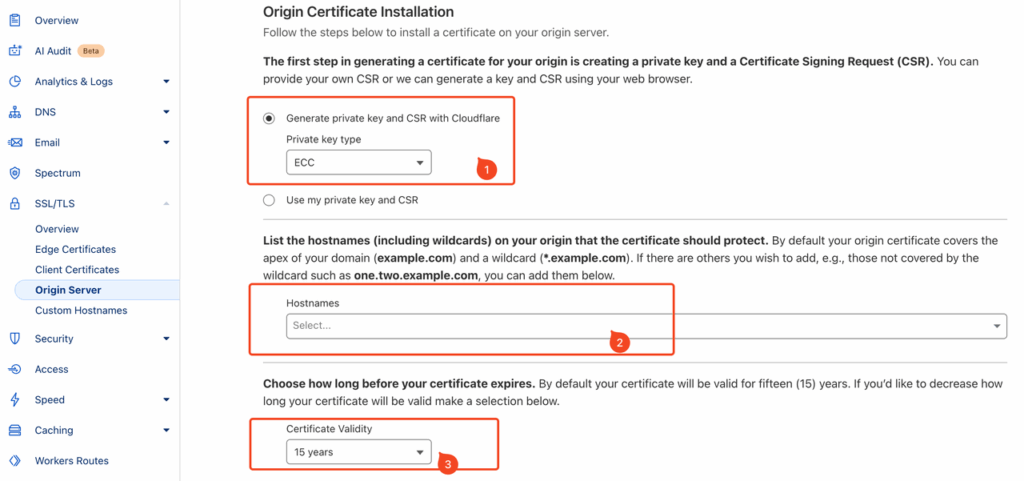
- Generate Private Key: It is recommended to choose ECC, which is also compatible with RSA.
- Hostnames: Enter the domains for which you want to generate the certificate, such as site.demo.com or *.demo.com.
- Certificate Validity: It is recommended to use the default validity period of 15 years.
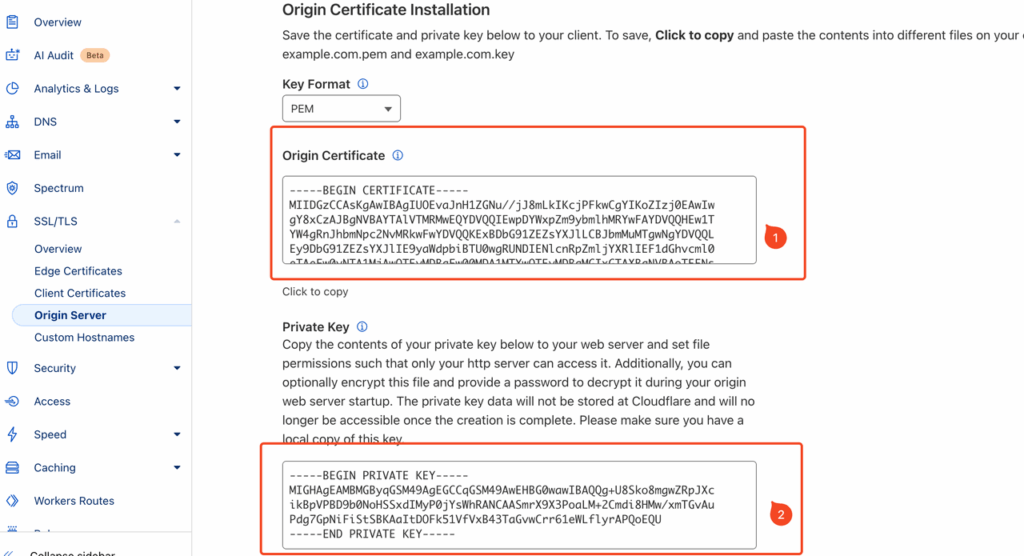
- After generation, save the Origin Certificate and Private Key (it is strongly recommended to back them up), as the Private Key will not be viewable again once you leave this step.
- Upload the saved Origin Certificate and Private Key through the domain binding configuration section in CORAOOL to complete the setup.
3.3 Example: DNS Only
If you are currently using the standard DNS services provided by AWS, AliDNS, or Cloudflare, then configuring an HTTPS domain certificate here requires you to provide an SSL certificate for the site you intend to host. There are two options:
- Recommended: Generate a separate SSL certificate specifically for your site’s domain (this can be a free certificate from a trusted authority or a paid enterprise-grade certificate), such as a certificate for sub.a.com.
- Alternative: Reuse your company’s existing wildcard domain certificate, such as a certificate for *.a.com.
The detailed steps are as follows:
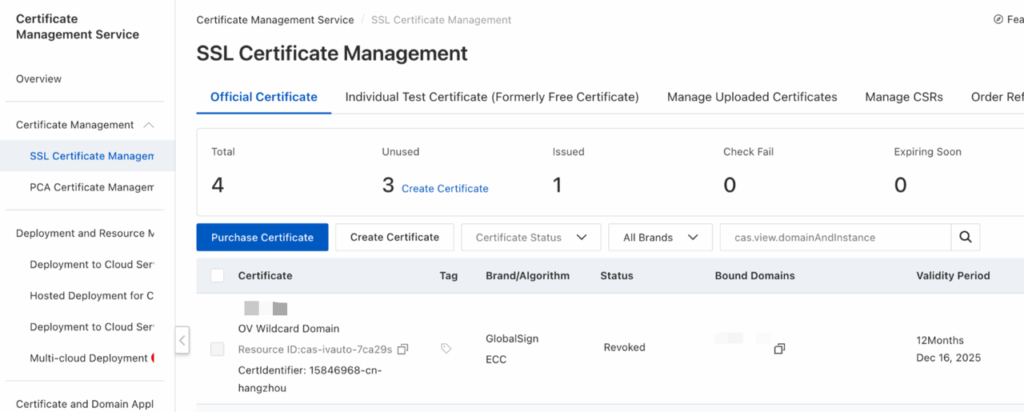
- Login to SSL Provider’s console, for exmaple the ALICLOUD SSL Cert Management https://yundun.console.aliyun.com/?p=cas#/certExtend/buy/
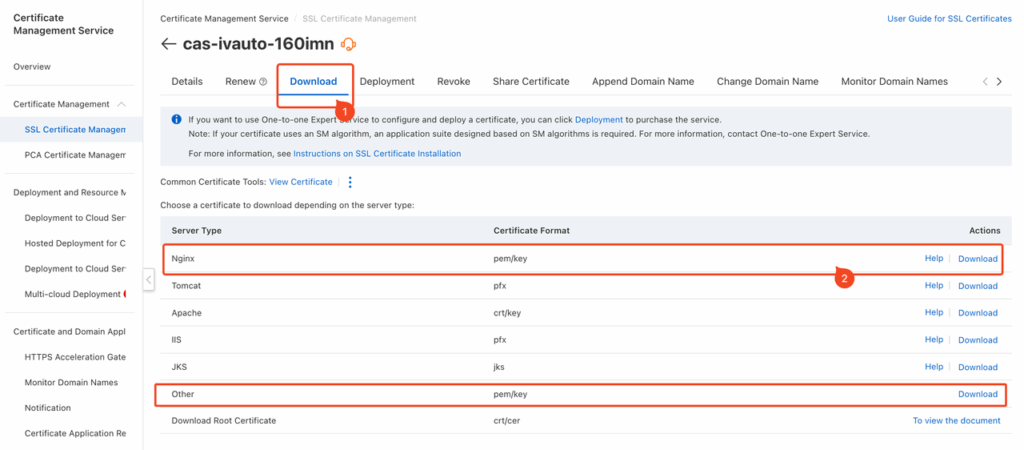
- Select an existing certificate, choose to download it, and select the PEM/KEY format.
- Upload the PEM and KEY files separately to the Certificate Management section within the Activity Management platform.


Comments (0)